Showing posts with label guest blog post. Show all posts

Tuesday, April 10, 2012

Movie Quote Cookies

Hi there! This week is spring break and we are busy having fun, so it is the perfect time to share with you my little adventure to Happy Hour Projects last week! Happy Hour Projects is one of my favorite about everything blogs, Adrianne does so many wonderful projects over there, stop by and visit her if you haven't before! Together we host fun holiday craft and recipe link parties together, be on the look out for another one when holidays approach! This month is a big month for Adrianne with her Script Frenzy challenge and since cookies are currently my favorite sweet to make, I decided to make cookies from 3 of Adrianne's all-time favorite movies, keeping with the script theme.
The quotes on the cookies above are from one of the movies. Keep reading to find out which one! These are made using a basic sugar cookie recipe and royal icing.
 
There are many different cut-out sugar cookie recipes out there. You can view my favorite cut-out cookie recipes on the Mrs. Fox's Sweets FAQ page. I like changing up the basic sugar cookie recipe using different flavorings. Once you have decided on a recipe, cut out, baked, and cooled your cookies you are ready to decorate. For the set of cookies that I am using for the quick tutorial below, I am using a glaze type icing, also found on my FAQ page.
To decorate the cookies you will need a few disposable piping bags, size 1 and size 2 tips, couplers, and I also like to have the covers to keep the icing from leaking on the table and to keep it from drying out.
Once the icing is in the bag, it needs to be closed off so that it doesn't leak out the other end. This can be done with a clip or rubber band.
Outline cookie with size 2 tip and let dry for about a half hour. This outline will prevent the inside icing from running off the sides when flooding in the next step. This glaze type icing is a little more difficult to to work with than royal icing and tends to spread out more, but it is also softer and taste better to me than royal icing.
Still using tip 2, fill in cookie being careful not to overflow the outline. These will need to dry for 8 to 12 hours before decorating with edible ink pens. Without using white coloring, the glaze icing is also a little translucent, but I thought it kinda worked here looking like parchment once it dried.
Once the cookies had dried, I used edible markers to write the quotes from...can you guess the movie?
Keep reading to find out what movie these are from!
These final cookies were made using royal icing. Since I outlined in black, I let the outline dry overnight to make sure that it wouldn't bleed. The next day I flooded the cookie with white, and later than evening piped the quotes on using tip 1. Can you name this movie?
 
These movies were all movies that Adrianne and I both grew up watching. I had a fun time with my daughter watching them all again before creating these cookies!
Movies from top to bottom: A Knight's Tale, The Princess Bride, and Labyrinth
Did you remember any of them?


Monday, April 2, 2012

Movie Quote Cookies at Happy Hour Projects!

Hey everyone! Today I am off and visiting with my good buddy Adrianne over at Happy Hour Projects! I have made movie quote cookies for 3 of her favorite all-time movies...with a little guessing game! Stop by and see if you remember the movies I have made cookies for!

Monday, February 13, 2012

"Best of Valentine's" Guest Post!

Hi everyone! Tomorrow is the big day!
Valentine's Day!
and today I am over at
Days of Chalk and Chocolate
to share some of my most popular Valentine's Sweets with Jenny's readers at Days of Chalk and Chocolate! Please stop by and visit over there. Jenny has such wonderful ideas on her blog and every Friday Jenny hosts the Latest and Greatest Friday Link Party where you can link up all of your wonderful projects!

If you haven't heard GFC (Google Friend Connect) is going away for those that aren't hosted by Blogger. A lot of us are adding the "Linky Followers" widget as a way to keep following us and to follow others. Be sure while you are here and over at Days of Chalk and Chocolate, and any other blog that you want to continue following, to look for the "Linky Followers" widget and follow that way also. Also if you have added the "Linky Followers" widget, be sure to leave a comment and let me know so that I can start following you that way too!

I also wanted to let you know that with Valentine's Day tomorrow, the Tuesday Sesame Street Character Cupcake post will be delayed a bit this week to make room for more Valentine fun! You still have all this week to join in on the "Share the Love" Valentine's Craft and Sweets Link Party and don't forget to enter the "EB Mine" Giveaway that I have going on right now too!

Have a sweet day!
Now hop on over and see Jenny and myself at Days of Chalk and Chocolate!

Friday, December 9, 2011

Mini Snowman Cupcakes

It's seemed so odd to be making cupcakes with snowmen on top when the windows were open and it was in the upper 70's out! I can't believe how warm it has been recently, but Jack Frost is on his way back and a chill is in the air again! These cupcakes were hand picked by my 3 year old for me to make. As soon as she saw the mini cupcake liners and tiny little snowmen candies, she reminded me with a huge grin "We've never had these before." How could I resist?
These are mini sized cupcakes, the liners are by Celebrate It! and the snowmen candy are by Wilton. I also get asked quite often when making cupcakes with this frosting design, "What tip is that?" It is an "8FT" by Bakery Crafts that I got at our local cake decorating store.
Here it is!
  

Today I am also over at The Artsy Girl Connection sharing a how-to on Christmas Cupcake Bites! Stop over and join us won't you?
Here is just a taste of the yummies I have in store for you over at The Artsy Girl Connection!

Pin It

Featured At:
RoCa & Company
A Little Inspiration
Food Corner: Decorating Challenge- Buttercream Icing

Thursday, October 27, 2011

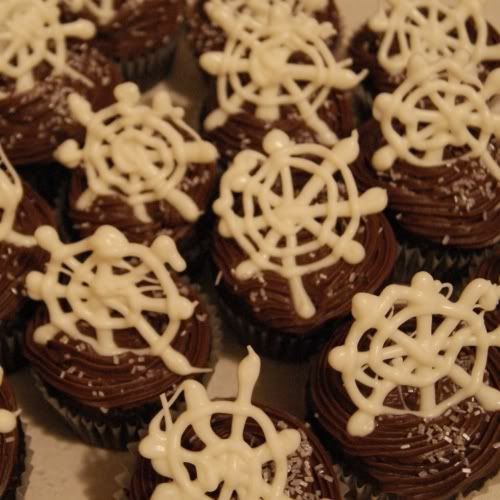
Spiderweb Cupcakes (Tutorial plus more!)

In case you missed it, earlier this week I went on an adventure to Happy Hour Projects and wrote my first guest post as Blog of the Week! If you haven't visited her, you should! Adrianne has such wonderful craft projects that can be done in about an hour! In keeping with the "Happy Hour Project" spirit, I made these cupcakes, which can be completed in about an hour, maybe a little longer, since the cupcakes will need to cool. The fun part...Adrianne made them too!
 
Spiderweb Cupcakes

What you need:
Cupcakes
Black Candy Melts
Spider Sprinkles
Black Sugar Sprinkles
Icing
Orange Gel Coloring
waxed paper
piping bag
tip 4 (optional)
tip 1M

Step 1: Bake your favorite cupcakes!
I used a recipe that I like quite a lot Buddy Valastro's Vanilla Cake- from the Rachel Ray Show Website. This time, I did make them a little bit different in substituting out half the butter for unsweetened applesauce. It does make the cake a slight different texture, but still taste great. You can also just take a box mix, add 1 cup water and 1 cup unsweetened applesauce as a healthier alternative, no eggs or oil, again a little different texture and slightly denser, but healthier.
-or-
Just bake up whatever cupcakes you would like, after all they are your cupcakes!
Let cupcakes cool before decorating. To speed up the process, stick them in the freezer for a few minutes!
  
Step 2: Make Spiderwebs
While cupcakes are baking, on waxed paper covered board pipe out your spiderwebs with black Candy Melts, I used Wilton Candy Melts. Microwave about 1 cup of melts in a microwave safe bowl for 1 minute on 50%, stirring halfway, I added about 1/4 tsp of shortening to the melts to make them easier to pipe. After candy is melted, pour into piping bag with size 4 tip, or just use a zipper bag and snip a tiny corner off to pipe for no clean up. However, I like the control of having a tip on a piping bag. Be sure not to make the spiderwebs too thin or they will break easily when removing from waxed paper.
 . Immediately after piping each spiderweb, add your spider candy while the it is wet, these are by Wilton also. Make a few extra to allow for breakage. Once you are done put them in the refrigerator to set.

Step 3: Make Icing
I made Buttercream, using margarine instead of butter, but feel free to use your favorite icing recipe, or just use store bought icing! Color your icing whatever color makes you happy! Place icing in piping bag fitted with 1M swirling tip. I find it easier to put the bag in a cup to fill it.
    
Step 4: Decorate Cupcakes
Starting from outside and working your way to the center, swirl the icing onto the cupcake.
 Immediately sprinkle with black sugar and add a few spider sprinkles. Gently remove spiderwebs from waxed paper and gently pressing into the icing. Eat and enjoy!
I also decorated up some cool Witch Hat Cupcakes to go with the Spiderweb Cupcakes!
 
Now get to baking and have fun!
Happy Halloween!

That wasn't a demand...but I was thrilled when Adrianne told me she was going to try making these cupcakes herself! I just love seeing photos of when people remake my sweets! It really shows me not only are people reading my post, but they must actually kinda like it!  Now Adrianne says she is "not a foodie," but even as a beginner she did an awesome job! Her husband even became part of the fun running to her, after grabbing the camera, as he heard alarming noises coming from the kitchen! She is unveiling her first piping adventure today on Happy Hour Projects!
Stop by Happy Hour Projects and read about her fabulous and a little funny adventure!

Adrianne did ask if I would share a few additional tips for newbies and here they are:
  • Using a piping bag takes a little getting used to! Whether it buttercream, royal icing, or candy melts, I like to use a large cup to hold the bag as I fill it and that will also catch any drips while filling. An extra pair of hands is also helpful!
  • I use black office binder clips to hold the piping bag shut at the top after I twist it closed, bread ties work as well.
  •  Until you get comfortable with using a piping bag, fill it no further than 4 fingers high, this will give you more control.
  • When holding the piping bag your pinky finger should be closest to the tip, kinda like you are making a fist.
  • When using candy melts they can be very drippy or not drippy enough. Trust me, too drippy is better, if you have to squeeze too hard the bag will burst, been there done that! Experiment with different sized tips to help control the flow. No matter what, I usually end up with some candy drizzle on the counter top from when I sit the bag down. Keep papertowels handy!
  • If your tip does become stopped up unstop it with a toothpick or straight pin.
  • If using the 1M tip, you will not need a coupler, just cut the bag to fit the tip, snip about 1/3 inch off the bag, try the tip in for size, snip a little more if needed.
  • When starting out, as with any hobby, expect a lot of trips to your local craft store for start up supplies, tips, bags, colors, etc. Michael's is great, you can go to their website and get 40% or 50% off coupons!
  • Don't stress over it, even a messy cake taste great! We are our own worst critics! Check out Cake Wrecks!
  • Most of all HAVE FUN!

and in case you still missed it....


Thank you so much Adrianne for inviting me to guest post as Blog of the Week and for walking me through ever step of the way! This has been a lot of fun!

These Cupcakes are Shared at:
Around My Family Table: Turning the Table Thursdays
Something Swanky: Sweet Treats Thursday
Talking Dollars and Cents: Sweet Temptations
 

Tuesday, October 25, 2011

Spiderweb Cupcakes

I'm Going on an Adventure Today!
Hi everyone! I am so excited that Adrianne from Happy Hour Projects invited me over to be Blog of the Week and to write my very first guest blog post! Adrianne's projects can usually be done in about an hour, so sticking with that theme, and just in time for Halloween, I am sharing a tutorial on how to make these Spiderweb Cupcakes...and they only take about an hour!
These Spiderweb Cupcakes were the cupcakes that I made to go alongside the Witch Hat Cupcakes!
 
Follow me on my adventure over to Happy Hour Projects and check out my very first guest blog post and learn how to make these cool Spiderweb Cupcakes or just stop in and say "Hi!"
 
Happy Halloween!

Learn how I made the Spiderweb Cupcakes on my guest post at Happy Hour Projects!
Learn how I made the Witch Hat Cupcakes right here at Mrs. Fox's Sweets!


Related Posts Plugin for WordPress, Blogger...