Showing posts with label Halloween. Show all posts

Tuesday, October 30, 2012

JELL-O Goblin Goo Drink

Happy Halloween!
Vampires, Witches, Goblins, and Ghouls alike will love starting a night of Trick-or-Treating toasting with this slimy Goblin Goo drink!
Here is what you will need for 2 goblets of goo:
1- 3 ounce package of JELL-O Gelatin
1/2 quart of prepared KOOL-AID

Prepare gelatin mix as directed on package. Refrigerate for about 4 hours until set. Break up gelatin with fork and spoon into cups. Finish filling cups with Kool-Aid.

I used grape JELL-O and strawberry KOOL-AID. The colors were too similar to show much difference. I think this would look great with lime gelatin and strawberry drink or try your own fun color combinations!
 I was a bit skeptical that this would be weird to drink or that I would have to chew it a lot. This drink is actually quite cool and yummy! Made in lighter colors it would make a very refreshing summer drink as well! Kids young and old will love drinking this slimy treat!

Wishing you all a safe and Happy Halloween!
~Christina


Friday, October 26, 2012

Easy Halloween Pretzels

As some of you already know, I am back to basics. I have been taking photos and blogging from my smartphone without the kitchen equipment and decorating supplies that I once had. Being back to basics, here is a simple and inexpensive way to make a cute snack for your Halloween table!
Here is all you will need:
Pretzels
Candy Melts
Sprinkles

To make these festive pretzels, start by covering cookie sheet with waxed paper. Melt candy melts in small bowl or coffee cup according to package directions. Dip pretzel into melts, tap off excess candy on side of cup, and place onto waxed paper. Sprinkle each pretzel immediately. Let candy set up in refrigerator for about 10 minutes. Store in airtight container at room temperature.
  
 Happy Halloween!
~Christina

Wednesday, October 10, 2012

Candy Coated Halloween Oreos

Make this fun and easy treat that everyone is sure to love this Halloween!
All you need is Halloween Oreo Cookies, a Halloween Wilton Cookie Mold, and Orange and Black Wilton Candy Melts!
I have made candy coated cookies using Wilton Cookie molds quite a few times for various holidays. All you have to do is melt the candy melts in a microwave safe container according to package instructions and fill each mold cavity 2/3 full with candy melts. Press in cookie. If needed, fill smaller spaces like cat ears and pumpkin stems using a piping bag with small end snipped off. Let set up in the refrigerator for 30 to 45 minutes or until cookies easily unmold. This mold makes 6 cookies.
Halloween Oreos have a fun orange colored cream center and 5 different designs!
Enter for a chance to win your own Halloween Oreos and lots of other cool stuff  by entering my Spook-tacular Halloween Giveaway!
Enter now through October 12, 2012 at midnight central time!

Disclosure: Kraft Foods is providing the prizes for this program at no cost to me and has provided me with a gift of equal value for review.  This program is not administered or sponsored by Kraft Foods or its affiliates, but solely by Mrs. Fox's Sweets. 
 
Until Next time....
~Christina

Thursday, October 4, 2012

Oozing Brain Fluid

Create this fun oozing brain fluid centerpiece that everyone will love with a few simple classic ingredients!
Here is what you will need:
2- 6 ounce packages of orange JELL-O Gelatin
1- 5 ounce can evaporated milk
1- 3 ounce package of strawberry JELL-O Gelatin
2 tablespoons cornstarch
JELL-O Halloween Brain Mold
  
Spray inside of brain mold with non-stick spray. In separate bowl, add 1-3/4 cup of boiling water to orange gelatin mix, stir for about 2 minutes until completely dissolved. Add 5 ounces of evaporated milk and stir. Pour into mold and let set up in the refrigerator for about 4 hours until firm.

Dissolve 1- 3 ounce package of strawberry gelatin, stir in cornstarch and mix well. Be sure to use a bowl large enough to accommodate boiling to avoid messes! Microwave 3 minutes. 

Place a few tablespoons of the hot strawberry gelatin mixture onto serving dish. Unmold and place brain. Spoon strawberry gelatin on and around brain.
  
Now make like a Zombie... eat and enjoy while warm!
  
Would you like a chance to win this JELL-O Halloween Brain mold and lots of other spook-tackularly fun stuff?

Enter now through October 12, 2012 at midnight central time!

Disclosure: Kraft Foods is providing the prizes for this program at no cost to me and has provided me with a gift of equal value for review.  This program is not administered or sponsored by Kraft Foods or its affiliates, but solely by Mrs. Fox's Sweets. 
 
Until Next time....
~Christina

Wednesday, October 3, 2012

Spook-tacular Kraft Halloween Giveaway & Pumpkin Cupcakes

Halloween is my favorite time of year! All of the fun decorations, dressing as anything you want to be, not to mention the cool crisp air and the trees changing color! When I was offered to do this post I just couldn't resist! What better way to get back to blogging after a little (okay extended) vacation!
Not only did Kraft send me all of this fabulous Halloween stuff, they are sending on of my readers the same gift pack valued at approximately $100!
This gift pack contains:
3 Halloween flavors/shapes of JET-PUFFED Marshmallows (new!)
2 Halloween JELL-O Molds and JELL-O product
  1 package of Halloween OREO cookies
2 flavors of VELVEETA Cheesy Potatoes (new!)
1 coupon for a free Seasonally flavored PHILADELPHIA Indulgence (new!)
1 Rachel Ray Orange Souped Up Bowl
8 glow in the dark plastic ghost cups
kids Halloween apron
Halloween serving dish
JELL-O Halloween Idea Booklet
Pumpkin Party Picks
 
There are so many possibilities of things that you can make from this package.
This is one of the many ideas I have decided to make!
 
Pumpkin & Cinnamon Cream Cheese Cupcakes
 The Spook-tacular Jack-o-Lantern Cupcakes were made using the Jack-o-Lantern picks and the coupon for th free Seasonally flavored PHILADELPHIA Indulgence. I chose the Cinnamon White Chocolate PHILADELPHIA Indulgence...yum!
Here is what you will need to make these cupcakes
1 box of spice cake mix
1 can of pumpkin
1 package (1-lb) of confectioners sugar
1 tub of PHILADELPHIA Indulgence (I used Cinnamon flavor)
  
Mix together cake mix and can of pumpkin well, 2 to 3 minutes. Bake in preheated 350 degree oven for about 18 minutes until toothpick inserted comes out clean. Let cool completely.
  
Mix together entire package of PHILADELPHIA Indulgence and confectioners sugar, until fluffy. Pipe icing on using piping bag with 1M decorating tip.
 
The icing turned out absolutely delicious with the PHILADEPHIA Indulgence Cinnamon flavor and is my new favorite ingredient to make cream cheese icing with!
   
 Look for many more Kraft inspired recipes to come over the next week!
   ~Christina


How to Enter to win this Giveaway:
All entries are to be submitted in the comment section, one winner will be picked by random.org to win this giveaway package. Giveaway is open to US residents only. To enter you must be a follower of Mrs. Fox's Sweets in some way and be sure to let me know how you follow with your entry (See social media links in right column!) Be sure to leave your email if it isn't visible in the profile you log on with to comment.

You may earn up to 3 entries in this giveaway!
1. Share this giveaway on Twitter to hey can also Tweet with #KraftHalloween and @MrsFoxsSweets for a chance to win your giveaway prize. Let me know in the comment section with the url to the Tweet and how you follow Mrs. Foxs Sweets.
2. Share this giveaway on Facebook and tag MrsFoxsSweets. Let me know in the comment section that you did so!
3. Share your Halloween ideas in the comment section below!

Enter now through October 12, 2012 at midnight central time!

Disclosure: Kraft Foods is providing the prizes for this program at no cost to me and has provided me with a gift of equal value for review.  This program is not administered or sponsored by Kraft Foods or its affiliates, but solely by Mrs. Fox's Sweets.
  

Giveaway has ended. Winner will be posted 10/14/2012!

Monday, October 31, 2011

Mrs. Fox's Sweets 2011 Halloween Recap

The day has finally arrived....
HAPPY HALLOWEEN!
Halloween is one of my favorite holidays of the year and I have made lots of desserts this past month in honor of it! This day brings out the kid in each of us! I love the costumes, trick-or-treating, spookiness, and cool crisp air, just to name a few things! Oh, and how could I forget to mention all the fun foods and creative desserts that Halloween lends ideas to?
Here are the Top 9 Most Visited Desserts from Mrs. Fox's Sweets, plus the last Halloween Dessert of the season:
  
Last Halloween Dessert: Miss Pink People Eater Cupcakes
     
#9: Spooky Nerds Cupcakes
  
#8: Fall Brownies


Okay I couldn't stop there...may as well recap all of the sweets that I have made!


Be careful and watch out for ghouls, goblins, and princesses running around!
It's still not too late to bake up something, unless you are reading this at bed time!
Hope you had or are still having a wonderful Halloween!
  
Note: The rankings were as of the last Blogger Stats update before finalizing this post. All others are in no particular order.


Saturday, October 29, 2011

Miss Pink People Eater Cupcakes

Does our drool turn you on?
 
Karen Tack and Allan Richardson from "Hello, Cupcake!" have done it again! Okay, this was from last year, but super CUTE! You can view an easy Video Tutorial at Taste of Home to learn to make the Purple People Eaters!
Liz from Hoosier Homemade has just made Purple and Green People Eaters this week and she shows how to make these with a fabulous Picture Tutorial at Hoosier Homemade!
With 2 wonderful tutorials already available, I was able to put down the camera and just have a lot of fun making the People Eaters and I am sharing the finished product!
My little twist to these guys gals, is I made mine into girls!
  
This is what you need for Miss Pink People Eater:
Cupcakes (I even colored the batter Pink!)
Canned Frosting (colored Pink!)
Large Marshmallows (for eyes)
Mini M&M's (for pupils)
Mini Marshmallows (for teeth)
Laffy Taffy (tongue)
Pretzel Sticks
Tube of Black Icing (for the eye lashes)
 
Aren't we ADORABLE?!

These Monsters are Making People Laugh at:

Friday, October 28, 2011

Candy Corn Cupcakes

Who doesn't love candy corn?
Okay, sure there are people that don't, but I do!
Remember these? My favorite box mix and this cute little cupcake party pack I got from Target?
Today, I am using the candy corn liners and pics from the set! I am showing you this, because I love cute cupcake liners and forgot to take a picture of the bottom of the cupcakes...lol! I love kits like this pick and liner kit, quick and easy way to make a cute cupcake, especially for parties or when you need to make a lot and there is no time for details.
I had not yet grabbed the candy corn out of the cabinet yet, so followed the color order from the picks and liners, is that the wrong order? I divided the batter in half and colored the first half orange and left the second half as is, since it was about the color of the yellow on the picks. I probably should have added some additional yellow coloring to the pale yellow batter. After the orange was in the liner, I added the filling, and then topped with yellow.
I topped the cupcakes off with Wilton Decorator Icing, a pick, and a few pieces of candy corn. Notice the different order of the candy corn colors on the actual candy corn? Yellow is on the bottom of the candy corn. The candy corn is by Branch's, which is my favorite from what I have tried. The picks, liners, and background paper all have orange on the bottom. Hmmmm?
Whatever the proper order, yummy was the flavor!
So what order is the colors on your candy corn?


These Cupcakes are Shared at:

Thursday, October 27, 2011

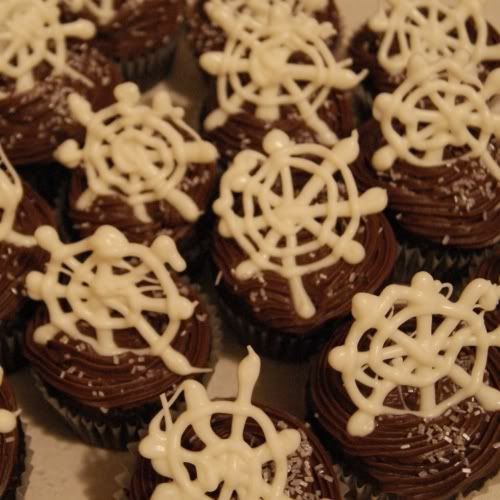
Spiderweb Cupcakes (Tutorial plus more!)

In case you missed it, earlier this week I went on an adventure to Happy Hour Projects and wrote my first guest post as Blog of the Week! If you haven't visited her, you should! Adrianne has such wonderful craft projects that can be done in about an hour! In keeping with the "Happy Hour Project" spirit, I made these cupcakes, which can be completed in about an hour, maybe a little longer, since the cupcakes will need to cool. The fun part...Adrianne made them too!
 
Spiderweb Cupcakes

What you need:
Cupcakes
Black Candy Melts
Spider Sprinkles
Black Sugar Sprinkles
Icing
Orange Gel Coloring
waxed paper
piping bag
tip 4 (optional)
tip 1M

Step 1: Bake your favorite cupcakes!
I used a recipe that I like quite a lot Buddy Valastro's Vanilla Cake- from the Rachel Ray Show Website. This time, I did make them a little bit different in substituting out half the butter for unsweetened applesauce. It does make the cake a slight different texture, but still taste great. You can also just take a box mix, add 1 cup water and 1 cup unsweetened applesauce as a healthier alternative, no eggs or oil, again a little different texture and slightly denser, but healthier.
-or-
Just bake up whatever cupcakes you would like, after all they are your cupcakes!
Let cupcakes cool before decorating. To speed up the process, stick them in the freezer for a few minutes!
  
Step 2: Make Spiderwebs
While cupcakes are baking, on waxed paper covered board pipe out your spiderwebs with black Candy Melts, I used Wilton Candy Melts. Microwave about 1 cup of melts in a microwave safe bowl for 1 minute on 50%, stirring halfway, I added about 1/4 tsp of shortening to the melts to make them easier to pipe. After candy is melted, pour into piping bag with size 4 tip, or just use a zipper bag and snip a tiny corner off to pipe for no clean up. However, I like the control of having a tip on a piping bag. Be sure not to make the spiderwebs too thin or they will break easily when removing from waxed paper.
 . Immediately after piping each spiderweb, add your spider candy while the it is wet, these are by Wilton also. Make a few extra to allow for breakage. Once you are done put them in the refrigerator to set.

Step 3: Make Icing
I made Buttercream, using margarine instead of butter, but feel free to use your favorite icing recipe, or just use store bought icing! Color your icing whatever color makes you happy! Place icing in piping bag fitted with 1M swirling tip. I find it easier to put the bag in a cup to fill it.
    
Step 4: Decorate Cupcakes
Starting from outside and working your way to the center, swirl the icing onto the cupcake.
 Immediately sprinkle with black sugar and add a few spider sprinkles. Gently remove spiderwebs from waxed paper and gently pressing into the icing. Eat and enjoy!
I also decorated up some cool Witch Hat Cupcakes to go with the Spiderweb Cupcakes!
 
Now get to baking and have fun!
Happy Halloween!

That wasn't a demand...but I was thrilled when Adrianne told me she was going to try making these cupcakes herself! I just love seeing photos of when people remake my sweets! It really shows me not only are people reading my post, but they must actually kinda like it!  Now Adrianne says she is "not a foodie," but even as a beginner she did an awesome job! Her husband even became part of the fun running to her, after grabbing the camera, as he heard alarming noises coming from the kitchen! She is unveiling her first piping adventure today on Happy Hour Projects!
Stop by Happy Hour Projects and read about her fabulous and a little funny adventure!

Adrianne did ask if I would share a few additional tips for newbies and here they are:
  • Using a piping bag takes a little getting used to! Whether it buttercream, royal icing, or candy melts, I like to use a large cup to hold the bag as I fill it and that will also catch any drips while filling. An extra pair of hands is also helpful!
  • I use black office binder clips to hold the piping bag shut at the top after I twist it closed, bread ties work as well.
  •  Until you get comfortable with using a piping bag, fill it no further than 4 fingers high, this will give you more control.
  • When holding the piping bag your pinky finger should be closest to the tip, kinda like you are making a fist.
  • When using candy melts they can be very drippy or not drippy enough. Trust me, too drippy is better, if you have to squeeze too hard the bag will burst, been there done that! Experiment with different sized tips to help control the flow. No matter what, I usually end up with some candy drizzle on the counter top from when I sit the bag down. Keep papertowels handy!
  • If your tip does become stopped up unstop it with a toothpick or straight pin.
  • If using the 1M tip, you will not need a coupler, just cut the bag to fit the tip, snip about 1/3 inch off the bag, try the tip in for size, snip a little more if needed.
  • When starting out, as with any hobby, expect a lot of trips to your local craft store for start up supplies, tips, bags, colors, etc. Michael's is great, you can go to their website and get 40% or 50% off coupons!
  • Don't stress over it, even a messy cake taste great! We are our own worst critics! Check out Cake Wrecks!
  • Most of all HAVE FUN!

and in case you still missed it....


Thank you so much Adrianne for inviting me to guest post as Blog of the Week and for walking me through ever step of the way! This has been a lot of fun!

These Cupcakes are Shared at:
Around My Family Table: Turning the Table Thursdays
Something Swanky: Sweet Treats Thursday
Talking Dollars and Cents: Sweet Temptations
 

Wednesday, October 26, 2011

Mummies, Monsters, & Hybrids Cake Pops

Meet the Mummy & Monster Hybrid Family
  
Mummies are spooking everyone all over the internet right now, but I recently saw them haunting over at 365 Days of Cake Pops and thought, hey, what a good use for my leftover white candy! As I was running out of white, I decided to make purple ones too and since mummies aren't usually purple, I am calling them monsters, and together they made a family!
I didn't have the cute Wilton Candy Eyeballs, so I decided to make them from Mini M&M'S instead! I used a Wilton FoodWriter to draw the pupils. I also used this new favorite tool of mine, the Wilton Tweezers. They came in the Deluxe Gum Paste Tool Set. I never knew how much I needed these! I have held things still and placed small things on pops with my fingers. I have tried using dollar tweezers, that haven't helped a whole lot. These have a very wide head and work very well! I am not saying to buy the whole kit, unless you need the whole kit, but investing in a good pair of wide headed tweezers is very helpful when working with small things!
These guys and gals are very easy to make and very forgiving!
I accidentally put a little too much frosting into the crumbled cake and had a feeling that some would crack, the bandages can be made right over any cracks. Without needing a perfectly smooth base coat of candy to start, these are made very quick! I added the eyes with an additional dab of melted candy. Using a spoon I drizzled on the "bandages."
If you haven't made cake pops before, this is a great starter project!
Not sure where to start? View my Basic Cake Pop Tutorial.
Related Posts Plugin for WordPress, Blogger...